
Author: Esker
Adding a Die to a Result

Remember when we said we’d follow up on our Quantitative Primer article with explanations of some fun stuff like how to figure out how guidance, bless or bardic inspiration affect success chances? No, that was more than a year ago? We’re going to do that here anyway!
There are a number of spells and features in 5E D&D that allow a character to add the result of an extra die to an attack roll, ability check, or saving throw. For example, guidance lets the affected character add 1d4 to an ability check, whereas bless does the same for attack rolls and saving throws.
If what we cared about were the average result of a roll, this would be easy: just add the average of the d20 roll and the average of the d4 roll together. But the average roll doesn’t matter when we’re talking about attempting something that either succeeds or fails. What we care about is the probability of success. And figuring this out exactly is a little bit harder, though as we’ll see, there’s a pretty simple way to get close.
In Part 1, we explained that when you roll a d20, add a modifier, and succeed if you tie or exceed a fixed DC, your success chance (without advantage or disadvantage) is

For an attack roll, just replace the DC with the target’s AC.
We also told you about independent events:
Given two events, each of which may or may not come to pass, and knowing that one of them happening tells us nothing about whether the other will happen (in probability jargon, they are independent, though note that this is very much not the same as being mutually exclusive) then the probability that both occur is the chance that the first one happens times the chance that the second one happens.
So what if we add a d4 roll to our d20? All together, there are 80 different combinations that can come up on the two dice: each of the 4 results of the d4, combined with each of the 20 results of the d20. Moreoever, assuming the rolls are independent and the dice are fair, all 80 of these are equally likely to happen. That means each combination has a 1/80 chance of occurring.
We can arrange these possibilities in a table like so, where the entries are the probabilities of particular combinations, which in probability are called joint probabilities:
| d20 / d4 | 1 | 2 | 3 | 4 |
|---|---|---|---|---|
| 1 | 1/80 | 1/80 | 1/80 | 1/80 |
| 2 | 1/80 | 1/80 | 1/80 | 1/80 |
| … | … | … | … | … |
| 19 | 1/80 | 1/80 | 1/80 | 1/80 |
| 20 | 1/80 | 1/80 | 1/80 | 1/80 |
There’s another fact about probability that will be useful to us, sometimes called the sum rule. It says this:
The Sum Rule: If we want to know the chance that any of several possible mutually exclusive outcomes occurs, we can simply add up the probabilities of the individual outcomes.
As a silly example that will serve as a sanity check, if we had the table above and we wanted to know the chance that the d20 came up 20 regardless of the d4 roll, we could find this by noticing that there are four combinations in which the d20 is a 20, each of which has a 1/80 chance of occurring. So overall, the chance of rolling a natural 20 is

Amazing!
Alright, let’s look at a more interesting case. What’s the chance that the total of the two dice is 7 or higher? Hopefully you can see that the sum rule, together with the fact that all 80 combinations have the same probability, means that this chance is determined entirely by the number of combinations for which the sum is 7 or higher.
As an aside, notice that static modifiers don’t affect things very much: if we know the DC*, then the minimum dice roll to succeed is just this DC minus all of the static modifiers. So needing a 7 or higher covers the case of a DC 7 roll with a +0, a DC 8 with a +1, a DC 9 with a +2, etc. Because of this, and to keep things (relatively) concise, we’ll refer from here on out to the Target, by which we’ll mean the minimum dice roll before modifiers that will yield a success.
*We’ll use “DC” from here on to avoid saying “DC or AC” repeatedly, but the same logic applies to attack rolls as to saves and ability checks.
It’s helpful to make a table like the one above, but instead of filling it in with probabilities, we’ll fill it in with the sum of the two dice.
| d4: 1 | 2 | 3 | 4 | |
|---|---|---|---|---|
| d20: 1 | 2 | 3 | 4 | 5 |
| 2 | 3 | 4 | 5 | 6 |
| 3 | 4 | 5 | 6 | 7 |
| 4 | 5 | 6 | 7 | 8 |
| 5 | 6 | 7 | 8 | 9 |
| 6 | 7 | 8 | 9 | 10 |
| 7 | 8 | 9 | 10 | 11 |
| … | … | … | … | … |
| 19 | 20 | 21 | 22 | 23 |
| 20 | 21 | 22 | 23 | 24 |
You may notice that the table consists of “diagonal stripes” within each of which the sum is the same. If we were to color in the cells that show a result of 7 or higher, the colored region would consist of a right triangle on top of a rectangle, where the hypotenuse (the long diagonal side) of the triangle piece traces the stripe consisting of 7s, and the rectangle extends from row 7 down.
So, how many individual combinations does this include?
The rectangle is 14 rows tall and 4 columns wide, so that’s 56 combinations. If we placed two copies of the triangle on top of each other to form a rectangle, it would have to extend either one row or one column beyond the first triangle, which means it would be either 4 by 5 or 5 by 4. Either way the double triangle consists of 20 combinations, which means one triangle consists of 10 combinations.
So, overall, there are 56 + 10 = 66 ways for the 1d20+1d4 roll to give us a result of 7 or higher, each with a probability of 1/80. That means our end success chance is 66/80 or 82.5%.
“But Tabletop Builds!” we hear you saying, “Surely I don’t have to go through this much effort each time I want to calculate the chance that the Barbarian succeeds on their Athletics check to open a stuck door with divine assistance from the Cleric’s guidance spell?”
Surely not!
What general takeaways can we extract from this example?
First, notice that the 56/80 success chance we got from the “rectangle” piece above was just the chance that the d20 met the DC all by itself. In other words, the success chance without the d4.
That means the added value of guidance or bless or whatever was just the chance that we got one of the outcomes in the “triangle”: results that would have failed without the d4, but which succeed because of it.
And the number of outcomes in that triangle was half of the number in a rectangle, one of whose dimensions was the size of the die, and the other of which was one bigger than that.
We can say something more general here, which is that if we add 1dX to a 1dY roll, the number of outcomes that would be failures with the dY roll alone, but which are converted to a success due to the dX is 


Each of these outcomes has a 
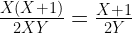
And here’s where all that work finally pays off: this is just the average roll of the dX, which is 
There are some cases involving very high or very low DCs where this formula isn’t exact, and things will also change when you have advantage or disadvantage. We’ll elaborate on these cases in the next section. But with a straight d20 roll and a DC in the common range between 10 and 20 or so, the additional dX increases the success chance by

or 12.5 percentage points in the case of a d4, 17.5 in the case of a d6, 22.5 in the case of a d8, etc.
This section deals with cases when the above formula doesn’t quite work. Consider it bonus material—you can skip it and just run with the simple result above as a good approximation, but if you want to be exact in all cases, then read on.
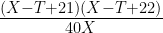
You might have noticed that for some (particularly high or particularly low) target totals, part of the triangle will be “cut off”. There are two ways this can happen: either the target is so high that roll can only succeed with the benefit of the extra die—for example, you might need a 22 or higher before modifiers—or the target is so low that the roll can succeed through the extra die alone, without any help from the d20—for example, you only need a 2 before modifiers.
In the first of a very high DC—the kind where even a natural 20 would still be a failed save if you don’t roll well enough on bless, say—the added probability still forms a triangle, but the base of the triangle may be smaller than the size of the die. If we need a 22 or higher before modifiers, we have no ways to succeed if the d4 comes up 1, one if it comes up 2, two if it comes up 3, and three if it comes up 4: the triangle only has 3 columns, and therefore 6 combinations. If we have to get at least 23, it only has 2 colummns, etc.
The general formula here is that if our target roll to succeed is 


to the chance of success.
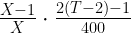
In the opposite case of a very easy task—the kind where rolling a 4 on bless would allow you to succeed even with a natural 1 on the d20—die roll 

If you get to add 1dX to a 1d20 roll—maybe you’re a caster rolling a concentration save throw with the benefit of bless, or a Barbarian making a Strength check to break the evil wizard’s doomsday device with the help of guidance – there are three tiers of difficulty, each of which produce slightly different formulas. Which tier you’re in depends on how high your roll needs to be before static modifiers, which we’ve called T, the target. This is simply the DC of the task minus your fixed modifier.
For moderate difficulty tasks—not so easy that a natural 1 will produce a success with a good enough bless roll, but not so hard that success is impossible without bless (specifically, where 

This is the most common case and you won’t go too far wrong by just using it all the time.
But for very high and very low target rolls, the exact increase is somewhat less.
If the DC is so low that you can succeed on a natural 1 as long as your bless roll isn’t too unlucky (specifically, where 

If 
If the d20 is being rolled with advantage or disadvantage, things get complicated, because now it’s no longer the case that all 80 combinations are equally probable. With advantage, higher values on the d20 are more likely, and with disadvantage low ones are more likely. So we can no longer calculate the benefit of the extra die by simply counting combinations. Instead, we have to add up the actual probabilities involved. And unfortunately, these are going to be different for each individual success threshold.
In fact, finding these probabilities in the first place involves similar reasoning to what we just did above, and can also be illustrated geometrically.
When we’re rolling with advantage or disadvantage, we roll 2d20. Instead of adding up the results, however, we keep either the higher or lower roll. Altogether, there are 
How many ways are there to roll exactly 6, if we’re rolling with advantage?
Let’s make another table, but instead of writing the sum in the cells we’ll write the larger of the two rolls.
| First d20 / Second d20 | 1 | 2 | 3 | 4 | 5 | 6 | … | 19 | 20 |
|---|---|---|---|---|---|---|---|---|---|
| 1 | 1 | 2 | 3 | 4 | 5 | 6 | … | 19 | 20 |
| 2 | 2 | 2 | 3 | 4 | 5 | 6 | … | 19 | 20 |
| 3 | 3 | 3 | 3 | 4 | 5 | 6 | … | 19 | 20 |
| 4 | 4 | 4 | 4 | 4 | 5 | 6 | … | 19 | 20 |
| 5 | 5 | 5 | 5 | 5 | 5 | 6 | … | 19 | 20 |
| 6 | 6 | 6 | 6 | 6 | 6 | 6 | … | 19 | 20 |
| … | … | … | … | … | … | … | … | … | … |
| 19 | 19 | 19 | 19 | 19 | 19 | 19 | … | 19 | 20 |
| 20 | 20 | 20 | 20 | 20 | 20 | 20 | … | 20 | 20 |
Here we see a different, but still regular, pattern. Instead of stripes, we have concentric “backwards L” shapes. We can see that all of the 6s lie along the bottom and right edge of a 6×6 square. In other words, they fill a 6×6 square from which a 5×5 square has been removed.
Hopefully it’s easy to see that an analogous result holds for any value: the number of ways to roll exactly r when you have advantage is 


The disadvantage case looks almost the same, except with the Ls facing the opposite direction. I’ll leave the details of the derivation as an “exercise for the reader”, but it turns out that the chance of rolling 
Key Interim Results
So the key results are that:
With advantage the chance of rolling

With disadvantage, the chance of rolling

Putting it Together
How much does adding 1d4 increase our success chance if we have advantage? Fair warning, the equations here get kind of messy.
The outcomes that turn a would-be failure into a success still (usually) form a triangle, but now each row of the triangle has a different probability associated with it. And these probabilities depend on the specific target we need to roll to succeed.
The base of the triangle is one row above the d20 result corresponding to the target number; that is, it corresponds to a d20 roll of 


In the row above, only 

For a total contribution of
and so on, until we’ve included
All together we have the following unpleasant formula, giving the amount by which adding 1dX to our d20 roll increases the chance of rolling

Most DCs will be covered by a summation ranging from 


If the roll in question is an attack roll—perhaps we’re looking at the effect of the bless spell, or Bardic Inspiration, or the Battlemaster’s Precision Attack—then the addition to the expected damage from the attack is simply this increase in probability times the average damage the attack would do if it hit.
In the next part of this haphazard series, we’ll look at how to evaluate the impact of limited use abilities that allow either additions to a roll or rerolls, but where the resource can be used after the initial roll is made. This includes some of the things we looked at here, like Bardic Inspiration and Precision Attack, but also things like the Lucky feat, the silvery barbs spell, and the Chronurgy Wizard’s Chronal Shift feature.
We’ll look at how the number of failures that get converted to successes per use of these abilities is impacted by the policy adopted for when to expend a use, how this policy impacts how many uses we can expect to go through in a standard adventuring day, and how to optimize the tradeoff between conservative policies, which have a high conversion rate per use but risk leaving uses on the table, and more liberal ones, which are less efficient per use, but also less likely to result in unused resources.
This was great! Thanks
Thanks! Glad you liked it!
Correct me if I’m wrong, but I’m pretty sure d20+dX is a lot easier to calculate if you just add the expected average of dX to the rest of your modifiers.
For instance, in your basic example where you need a 7 or higher to succeed: treating the d4 as the expected average of 2.5 modifies the needed roll to 4.5. The probability of that is 16.5/20, which is exactly the same 82.5% chance given by your formula.
Thanks for the comment, Dizzy!
This shortcut gives you exactly the “typical case” I talked about, which will work most of the time. For extreme DCs (relative to modifier), this will slightly overestimate the benefit of the additional die. This is what I went over in the section labeled “edge cases”.
TabletopBuilds contributor Sylv also made the following useful observation: notice that if that trick worked in all cases, you’d be able to use the same procedure to add a d20 to a d4 roll instead of the reverse, resulting in negative target rolls, and probabilities bigger than 1!
Hello, I’m making myself a calculator for dpr in python, and the minimum for the upper bound of the summation is confusing me. Given a T of 10 and X of 4 for example would give an upper bound that is less than the lower bound which to my knowledge is not proper sigma notation and would give a sum of 0 as there are no cases where 1 <= j <= -3
If you could give some more insight as to how you came up with the functions for the bounds of the summation, it would be much appreciated.
P.S.
I wasn't able to see my test when commenting using dark mode. It's not a big issue, but I thought y'all would want to know. I love the site and the information you guys are providing everyone!!! 🙂
Thanks for pointing this out; I think I flipped a sign somewhere! That’s what I get for writing a formula without writing the explanation! The explanation is below, but the tl;dr is that the min in the upper bound should simply be min(X, T-1). I’ll ask the webmaster to fix this in the article.
Explanation:
The sum is stepping through d20 values that are less than the target total but where the dX can put it over the edge. It starts with higher d20 values, where we need less help from the dX, and steps down from there. The index j represents the smallest value on the dX that will succeed, conditioned on the d20 roll.
The max on the lower bound is relevant when the DC is so high that even on a 20, we need better than the minimum dX roll to succeed. In other words, starting when T=22, even with the best d20 roll, the dX has to be at least 2, so there’s no case where j=1. That’s why at values of T bigger than 21, j has to start above 1.
The min is relevant when the DC is so low that even if the d20 comes up 1, we can still succeed with a good enough dX roll. This happens if the target is X+1 or less. If T=X, then even with the worst case d20 roll (i.e., a nat 1), we succeed if the dX comes up X-1. If T=X-1, then on a nat 1 we still succeed as long as the dX comes up X-2 or better. Etc. In general, when we roll a nat 1, the minimum dX roll that will succeed is T-1.